The Primaries Color Tab is where probably 80% of your coloring happens. That is something that you should use every time when you do the color grading for footage. Therefore, it is essential to know this tab in detail.
In this article, I explore the hood of these primary color tabs. I had already written an article about the full Color Tab. You can see how the Color Tab of DaVinci Resolve Studio 19 works.
Okay, that’s enough for that. Let’s dive into this.
Table of Contents
Overview of the Primaries Color Tab
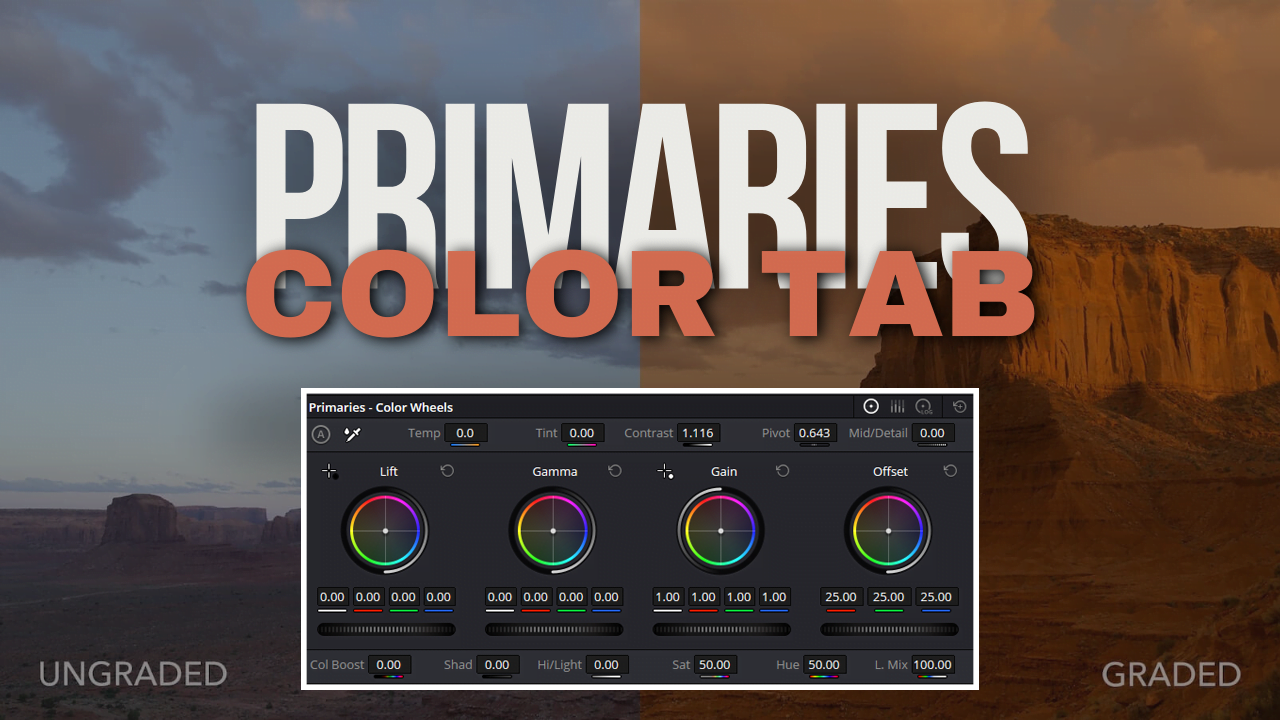
We can see many options by looking through the primaries-color tab in DaVinci Resolve. We have (top to bottom) the main color wheels, secondaries, and log wheels.
The three bars in this section are the top, middle, and lower. You would find numerous options within each bar. I am going to try to cover all those sections/options.
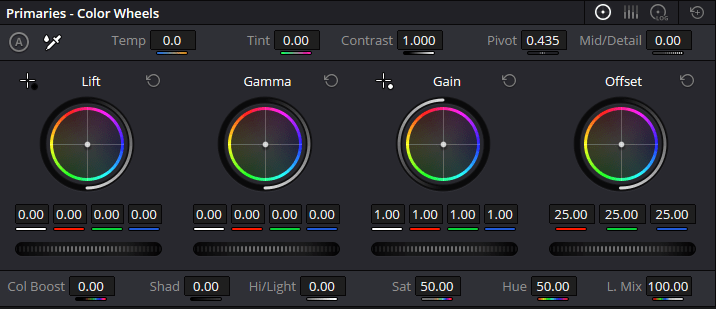
We have lift, gamma, gain, and offset smack bang in the middle bar of color wheels & bars. Log Wheels (with Shadow, Mid-Tone, and Highlights/Offset)
The top bar of those Colour Wheel and Bubble Charts comprises Temp, Tint, Cont (Contrast), Pivot, and MD. Also shown at the bottom are col boost, shad, Hi/Light, Sat, Hue, and L. Mix this with color wheels over other color bars.
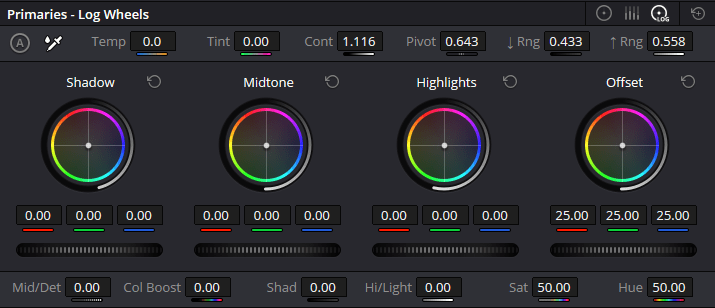
Log Wheels: We also see a range of color bars and wheels. At the upper bar, we see Temp, Tint, Cont, Pivot, Rng up and Rng Down.
Mid/Det, Col Boost, Shad, Hi/Light, Sat, and Hue are farther down in the bar.
Color Wheels And Color Bars
We see this in the color wheels and color bars we discussed earlier. Lift, Gamma, Gain, Offset. At the bottom, we also have Col Boost, Shad/Hi-Light/Sat/Hue, and L. Mix. Instead, just use Temp, Tint, Contrast (in case of emergency), Pivot, and Mid/Detail in the upper bar.
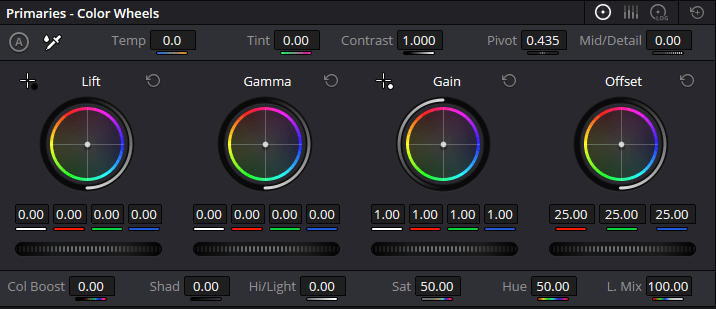
Some of this is the same as color wheels, but some parts fundamentally differ in how they present that middle interface. Gamma Gain: you get 4 nobs in the filter, counter-loser. In the offset, we can find 3 nobs.
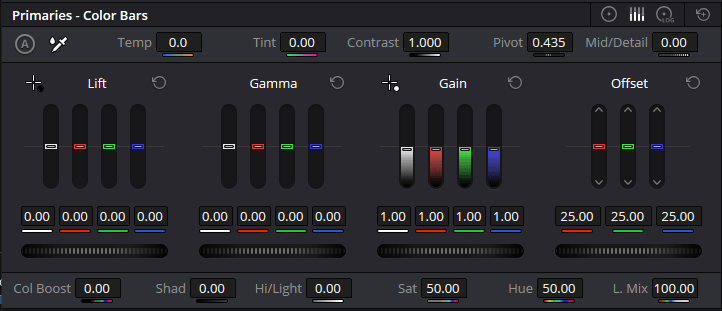
These are basically white. amounts of red, green, and blue colors in that section. Don’t worry, I will explain everything.
Color Bars, Color Wheels: Upper Bar
Color Bars & Color Wheels: The top bar of Coolors is where you make quick and powerful changes to your color grading efforts.

They may be basic tools, but the combination of these sliders has a huge impact on what your footage will end up looking like.
To figure out what all of that means, Dive in with us as we dissect basic elements — Temp, Tint, Contrast, and Pivot will guide you on how finicking a few values can drastically change the look of your visuals.
Temp
Temp stands for temperature and is how to adjust the overall warmth or coolness in the color grade.
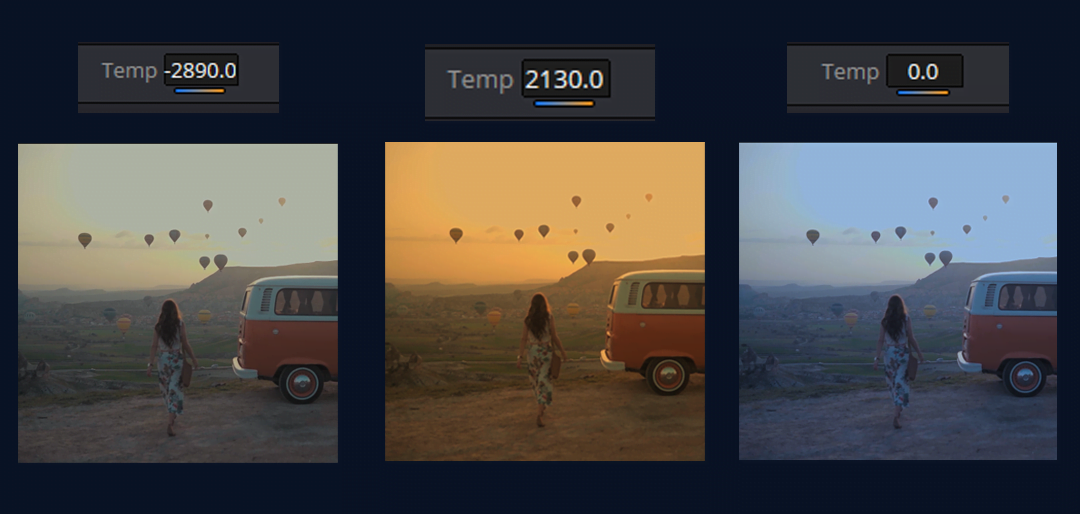
Here, you compare various temperatures so you can properly understand what temperature is and how to apply this to your project. You can change the temperature of your footage by dragging it to the right or left. To raise or lower the Temperature amount, click and drag it right to increase (left if you want less).

Pro Tip: Click Temp, then double-click the word(Temp), and it will reset. This also works for any other part of the Primaries color tab.
Tint
Tint is kind of like Temp’s more chic hipster sister. Instead of warmth and coolness, with Tint, you balance between green (less red) or magenta (more red).
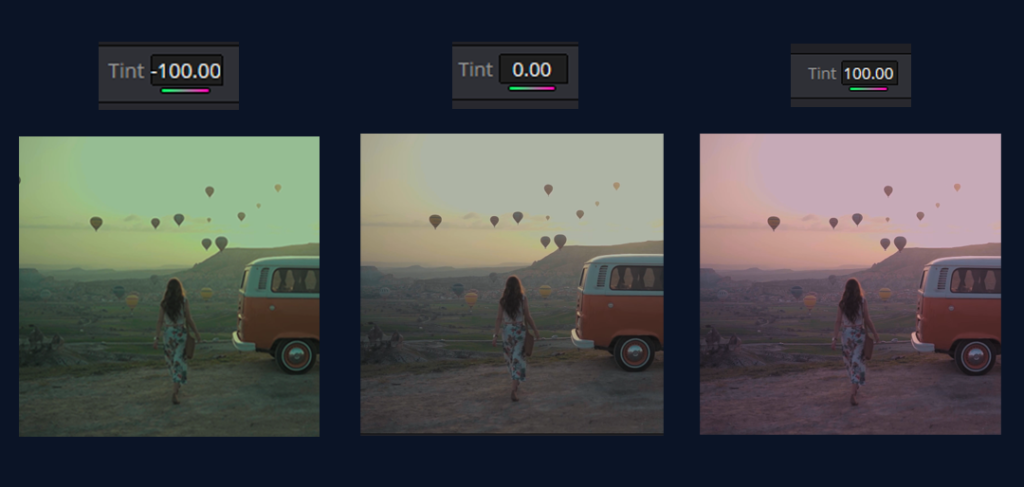
This can be really helpful if your footage is colored weirdly and you want to balance it out. A good example is adding a hint of magenta to combat sickly and green tones in the skin. The difference is subtle but crucial for accurate color representation.
Contrast
Contrast is the powerhouse tool for making your images pop. It increases the difference between the lightest and darkest parts of your image, adding depth and drama.
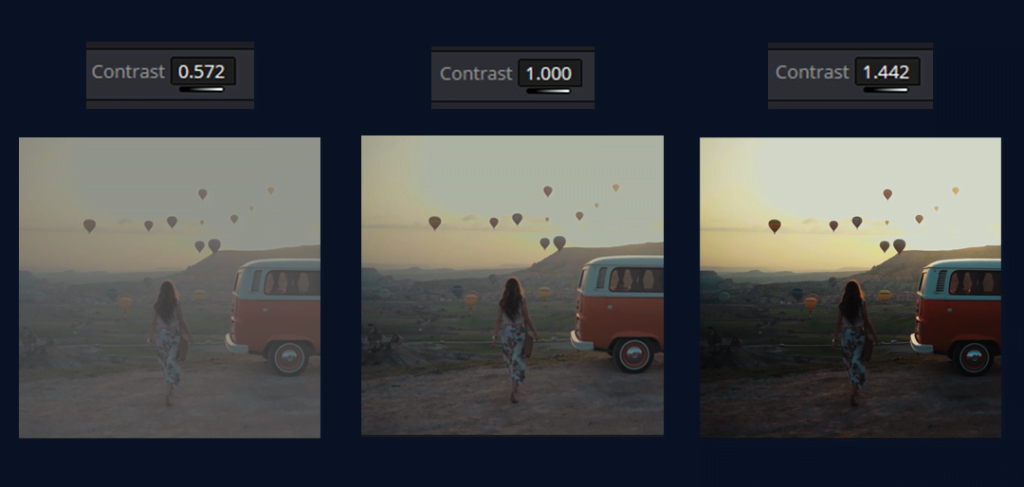
Do you want to push the shadows darker or stick out those highlights? You may need to just tweak that contrast slider. However, remember that excess contrast can make the image appear violent and is all about striking a balance.
Pivot
Pivot may seem minor, but it is quite the secret ingredient on the axis front. If contrast were how strong the overall adjustment is, Pivot would be where we meet our middle, at which point we would adjust along that line.
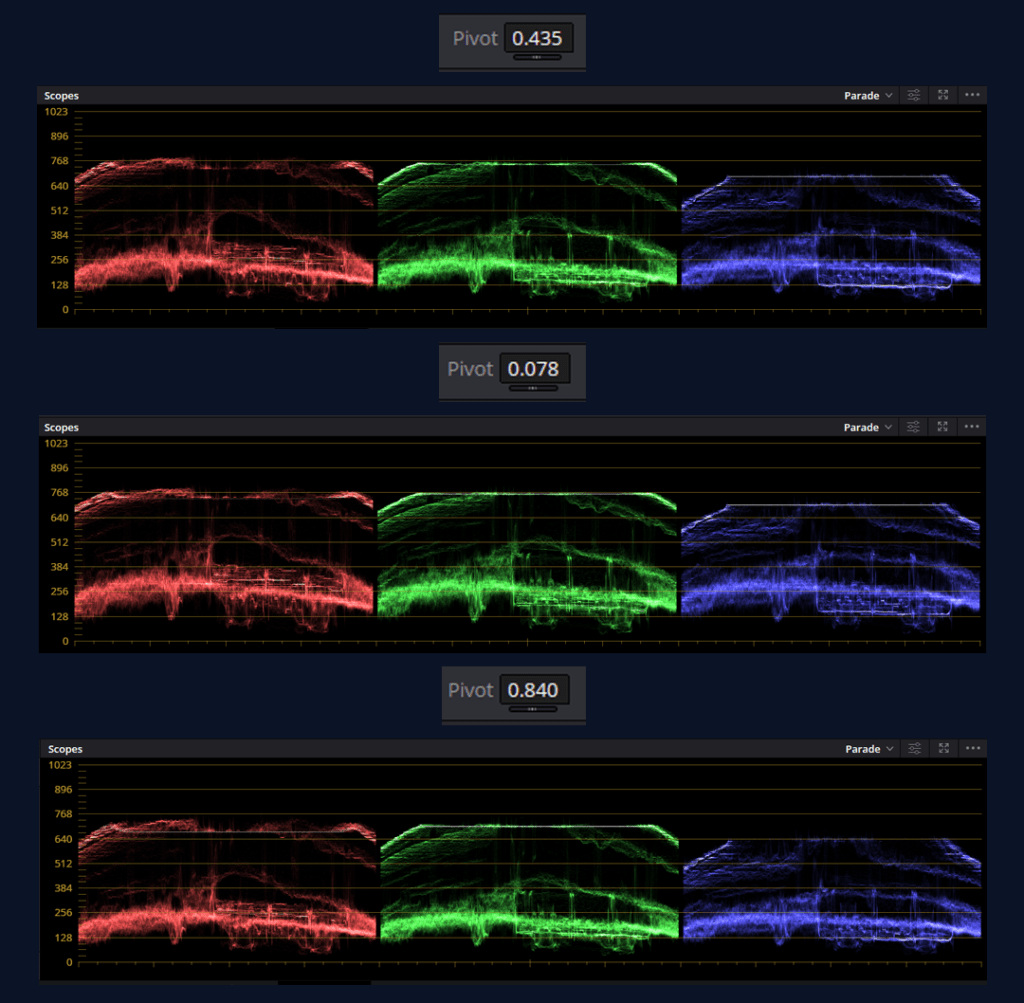
There is no specified theory on how large and supervoting the pivots can become, but increasing the number of pivots will increase scopes with height. That is, if you lower the volume, then the low bar will decrease. This is incredibly important to the overall intensity.
Think of it as the fulcrum of a seesaw—move it one way, and it’ll affect the highlights more; move it the other, and the shadows get the attention. Mastering Pivot allows you to fine-tune how Contrast affects different parts of your image, giving you precise control over your grade.
Mid/Detail
Mid/Detail slider changes work on the middle range of brightness, where most details are in your image. We should be able to lighten or darken the image without affecting the extremes (highlights and shadows). for then, we have to adjust the midtones.
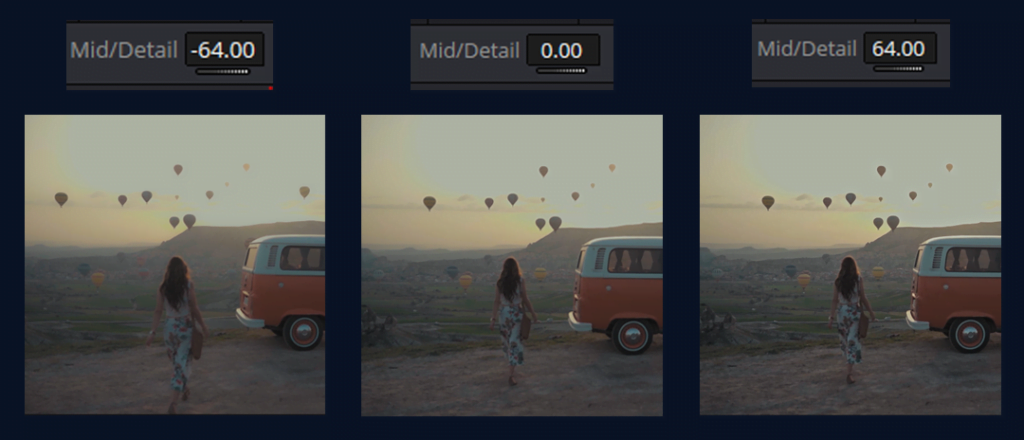
Detail adjustments can make your image appear sharper by revealing both its textures and finer elements.
Middle Bar of the Color Wheels And Color Bar
The middle bar of the Color Wheels and Color Bars is where you adjust the tonal balance on your footage. To create a unique look, you can go down the rabbit hole and adjust shadows, mid-tones, highlights, and entire pictures.

In the rest of this post, we will dissect these tools — Lift, Gamma, Gain & Offset- one by one and see how they help you craft an astonishing image.
Lift
Lift affects the darkest parts of your image or shadows. You can raise or lower Lift to open up shadows more without changing mid-tones and highlights.
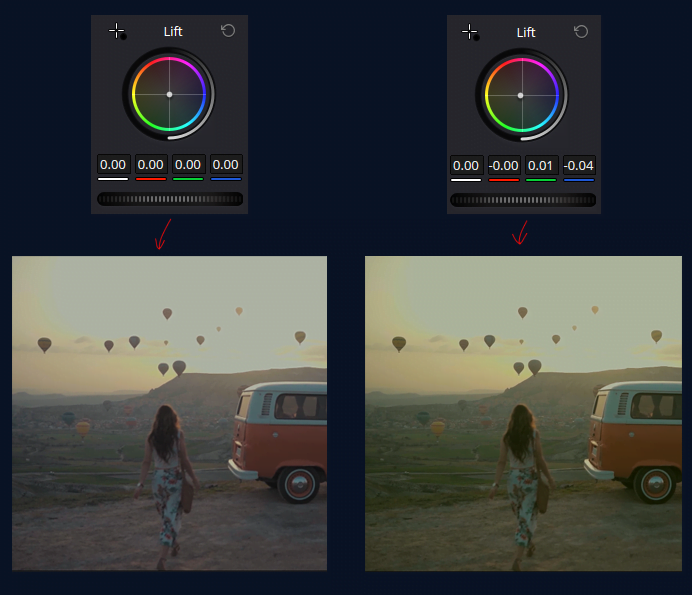
It helps establish the groundwork for your image… ensuring that shadows are dense and deep or soft and low, respectively.
Gamma
Gamma is all about the mid-tones—the middle range of brightness in your image. Adjusting Gamma lets you fine-tune the overall lightness or darkness of the midtones without altering the extremes (shadows and highlights).
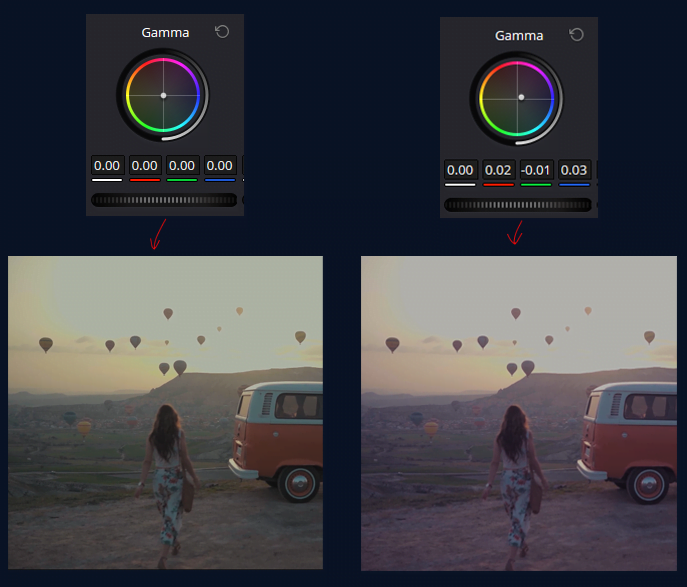
This is where you can have a big effect on the overall mood of your image, making it lighter and more airy or darker & moody.
Gain
Gain: Handles the highlights or brightest part of the image. Gain — that you can use to boost or reduce the brightness of these Highlights, making your scene more CONTRASTY and detailed.
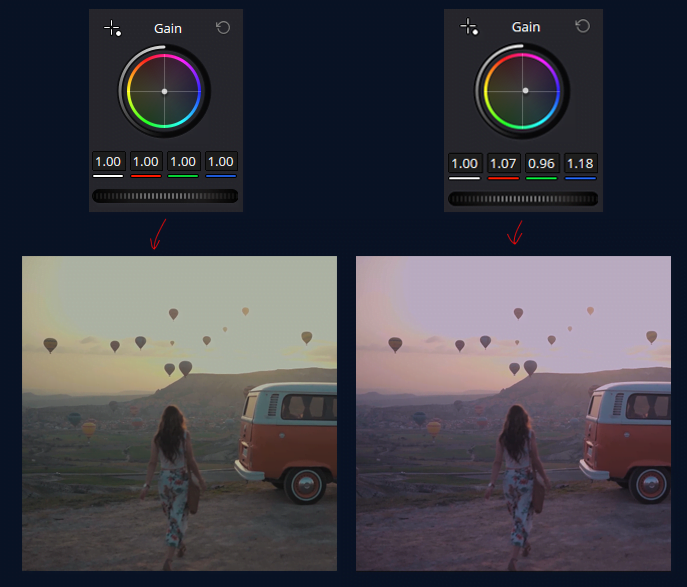
This is where you can make the highlights pop or bring them down for a more subtle look.
Offset
Offset is your tool for making overall adjustments to the entire image. Lift, Gamma, and Gain target-specific tonal ranges; Offset shifts the entire tonal balance—shadows, mid-tones & highlights up or down.
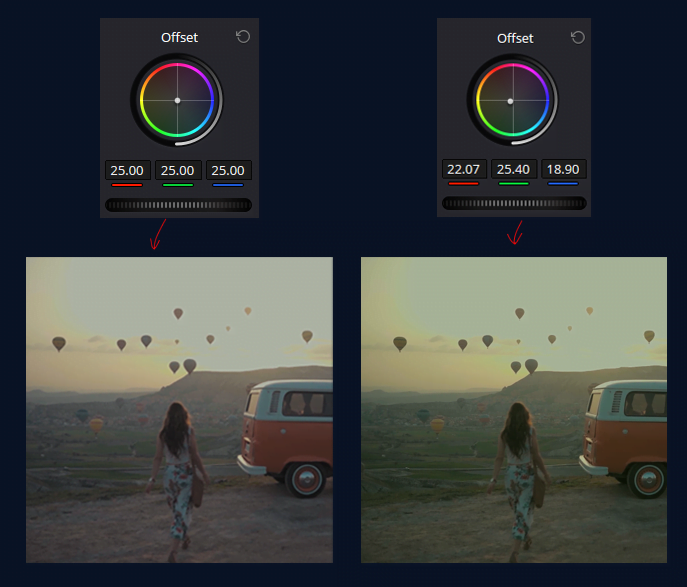
This is great for applying global tonal adjustments — meaning if your footage needs to be brighter or darker, you can do so with one adjustment.
Lower Bar Of Color Bars And Color Wheels
The lower bar of the Color Bars and Color Wheels is where you refine the colors and tonal subtleties of your footage. This bar gives you control over color saturation, balance, and the intensity of specific areas in your image.

Let’s explore the tools in this section—Col Boost, Shad, Hi/Light, Sat, Hue, and L. Mix—and how each helps you perfect your color grading.
Col Boost
Col Boost, or Color Boost, enhances the saturation of the less saturated areas of your image without affecting the already vibrant colors. It’s like giving your duller colors a little extra life while keeping the more intense ones in check.
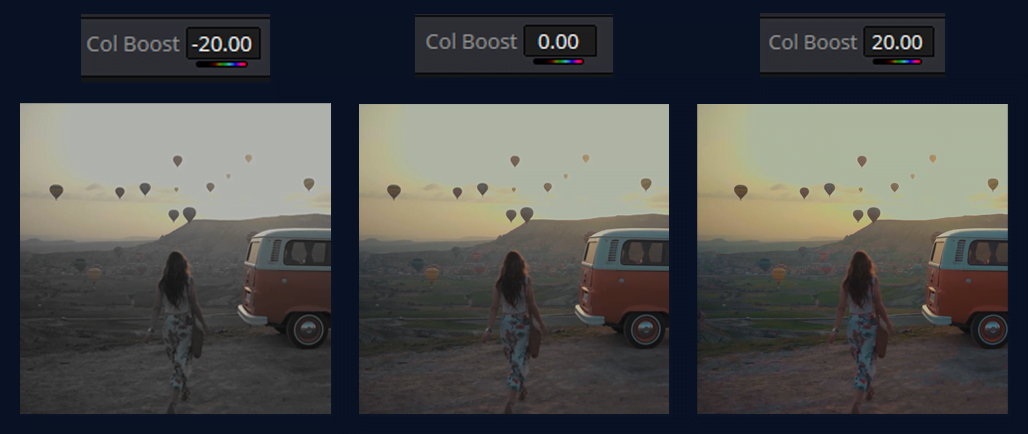
This tool is perfect for adding richness and depth to your colors without overdoing them.
Shad
Shad, short for Shadows, allows you to make specific adjustments to the color and intensity of the shadow areas in your image.
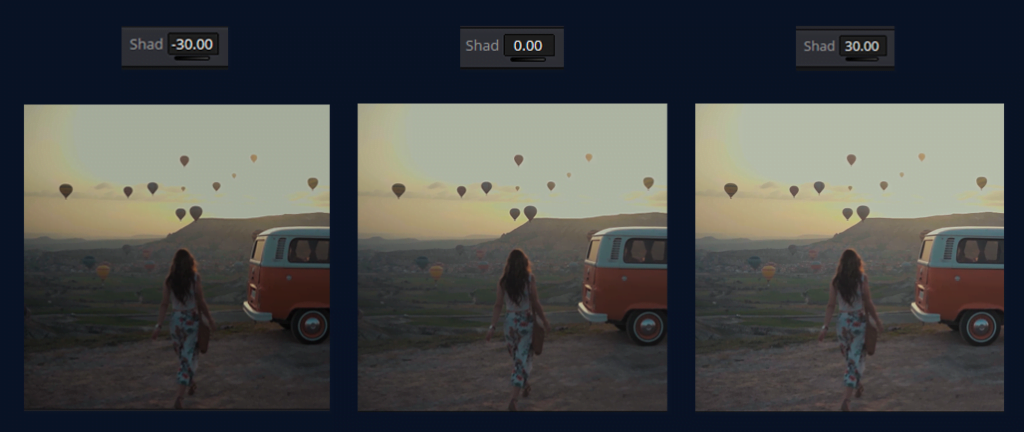
Depending on the look you’re going for, you can deepen the shadows to create more contrast or slightly lift them to reveal more detail.
Hi/Light
Hi/Light, or Highlight, controls the brightness and color of the highlights in your image. You can adjust this to make the bright areas pop or tone them down to avoid overexposure.
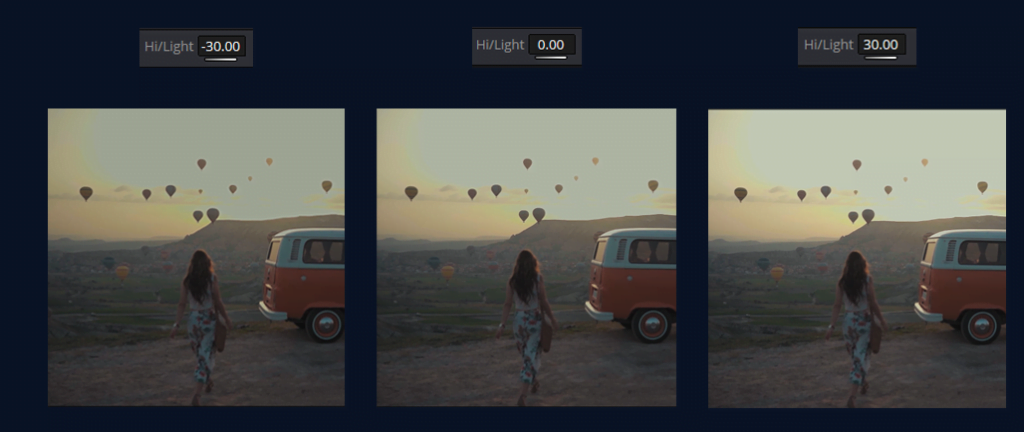
It’s crucial for managing the brightest parts of your image and ensuring they’re not too overpowering.
Sat
Sat, or Saturation, controls the overall intensity of the colors in your image. Increasing saturation makes the colors more vivid and vibrant while decreasing it gives your footage a more muted, desaturated look.
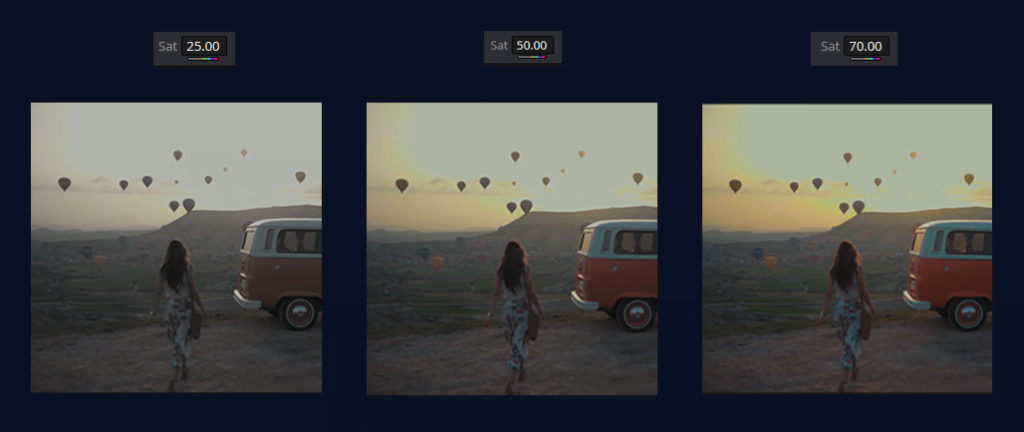
This tool is essential for achieving the right level of color intensity in your project.
Hue
Hue adjusts the overall color balance of your image, allowing you to shift all the colors in the spectrum.
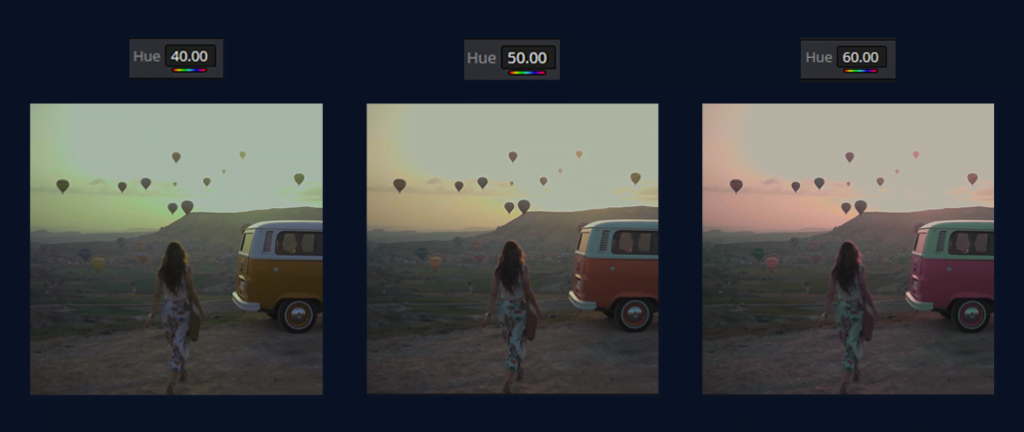
This tool is powerful for creating stylized looks or correcting unwanted color casts. It’s where you can get creative with your color grading, pushing the colors in one direction or another.
L. Mix
L. Mix, or Luminance Mix, adjusts the balance between color grading adjustments and the original luminance (brightness) of your footage.
This tool is handy for preserving the natural brightness of your image while applying color corrections. It’s the key to maintaining detail and contrast even as you tweak colors.
Log Wheels
Acts like the Primary Color Wheels but is more adjustable. The Log Wheels can also make very fine distinctions between shadows, mid-tones, and highlights and handle the entire image in a way that the Primaries Color Wheels cannot. But this can be done smoothly in the log wheels.
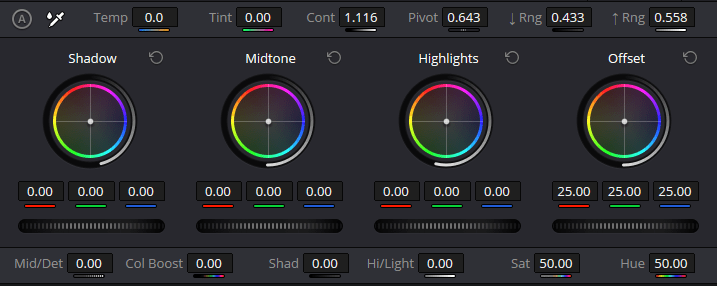
Color grading is my favorite area of this section.
Shadow
The Shadow control in the Log Wheels allows you to adjust the darkest parts of your image. Unlike Lift in the primary color wheels, Shadow in the Log Wheels targets a narrower range, making it ideal for subtle adjustments. You can darken or lift the shadows without affecting the midtones and highlights, which is crucial for maintaining detail in low-light scenes.
Midtone
The Midtone control focuses on the middle brightness range, where most of the detail and color of your image resides. Adjusting the mid-tones allows you to influence the overall feel of your footage—brightening them adds a lively, open feel, while darkening them can introduce a moody, dramatic tone.
Highlights
The Highlights control lets you adjust the brightest parts of your image. This is where you can make the bright areas of your footage pop or tone them down to prevent overexposure. The Log Wheels’ Highlights adjustment is more selective than Gain, allowing for more detailed work in the brightest areas.
Offset
The Log Wheels Offset, this one control will move the entire tonal range of your image. This adjusts the shadows, mid-tones, and highlights in a sweeping way.
So, Offset is great for larger, more global adjustments to your footage, whether in terms of overall brightness or color balance.
Upper Bar Of Log Wheels
The top bar of the Log Wheels section in DaVinci Resolve Studio contains essential controls for refining your color grade. You’ll use these frequently to perfect your adjustments.

Temp
You can cool off or warm up your image on the Temp slider by changing its color temperature.
This is crucial for matching the lighting from one clip to another or setting a specific atmosphere in your movie.
Tint
This helps you to perfectly white balance your footage and remove any green or magenta color casts with the tint adjustments.
This is especially handy for maintaining natural-looking skin tones in difficult lighting conditions.
Cont
Cont, or Contrast, in the Log Wheels lets you adjust the difference between your image’s light and dark areas, enhancing the overall depth and dynamic range.
Pivot
The Pivot control shifts the midpoint of your contrast adjustments, allowing you to decide whether your contrast changes affect the lighter or darker parts of your image more.
Rng Up & Rng Down
Rng Up and Rng Down allows for the different ranges of tones that you can affect with your Log Wheels.
That way, you can fine-tune and hone in on certain tonal regions within your image without impacting the rest.
Lower Bar Of Log Wheels
You will also get additional controllers to do more advanced color grading at the lower bar of the Log Wheels section in DaVinci Resolve.

Mid/Det
The Mid/Det (Midtone Detail) control sharpens or softens the mid-tones, bringing out or smoothing over textures. This adjustment is critical for enhancing or refining detail without affecting the overall sharpness of the image.
Col Boost
Col Boost increases saturation in the lowest areas of lowly saturated, giving your colors a real kick without going too far on intense. This can make your image stand out while still keeping it somewhat balanced.
Shad
Shad allows you to make further tweaks to the shadows, giving you even more control over the darkest areas of your image.
Hi/ Light
Hi/Light lets you fine-tune the highlights, ensuring that the brightest areas of your image are just right, neither too dull nor too blown out.
Sat
Sat adjusts the overall saturation of your image, controlling the intensity of all colors. It’s essential for achieving the right level of color vibrancy.
Hue
Hue allows you to shift the entire color spectrum of your image, creating stylized looks or correcting color balance issues. This is where you can get creative with the overall tone of your footage.
FAQs
What the Primaries Color Tab Appears like in DaVinci Resolve Studio 19
A lot of color grading takes place within the Primaries Color Tab in DaVinci Resolve Studio 19. It includes tools for adjusting the tonal balance, color temperature, contrast and all the basic parts of your footage so it helps get that exact look you want.
What are the features in Primaries Color Tab in DaVinci Resolve?
The Primaries Color Tab has 3 main sections — the Upper Bar (controls like Temp, Tint), Middle bar (main color wheels for Lift-Gamma-Gain-Offset) and Lower bar which includes components to refine colors such as Col Boost–Shad-Hi / Light-Sat – Hue L.Mix.
So how exactly my footage changes with the Temp control in DaVinci Resolve?
Temp(Temp): This adjusts the general warm/coldness of your image. It would mean dragging it off to the right in order warm up(ro yellow) and drag it even further left should cool down(blue). Adjust color temperature: this is the main use of it.
Color Grading: What Does the Tint Slider Do in DaVinci Resolve?
The Tint slider ranges in color balance from green to magenta. This option is useful for adjusting color casts, such as skin tones and to work with the general balance of colors throughout all your footage.
What is the Interaction of Pivot control with Contrast in DaVinci Resolve?
The mid-point of contrast settings, also known as the pivot — essentially decides if your image will be more affected by lighter or darker areas in terms of contrast. You need it to be more precise adjusting contrasts on your footages.
What, in fact are Lift &Gamma and Gain?
Lift impress the dark areas in your image (Shadows) without touching on mid-tones and highlights.
Gamma — Gamma deals with mid-tones, lighting and darkening of this range in overall.
The gain brightens up the highlights from which you can adjust just how white (or black) they will appear on your image.
How does the Offset control factor in?
Offset gives you control over the entire tonal range, moving shadows and highlights () along with mid-tones in one move. Good for swift changes in overall brightness, or color tone.
How does the Color Boost control differ from saturation?
Color Boost is used to enhance the color saturation in areas where there are many saturated colors, while it lets less vibrant ones alone. This is a great subtle way to make the colors in your footage pop without making most of it super saturated.
What does Log Wheels versus Primary Color Wheels mean in DaVinci Resolve?
The Log Wheels can be adjusted very precisley in comparison to the (Primary) Color Wheels, which allows you to make much finer differentiation between shadows and high lights. They provide more control over the colorization process, which is especially useful while operating on given tonal ranges of your image.
I try to cover every section of the Primaries Color Tab easily. I hope that will be really helpful for your editing journey. If you learn anything, you need to start at the very basics.
That will help you to boost your learning. When you try to bring your idea, your basics will help you perfectly in this section.

